博客魔改教程总结(二)
魔改前必看(我当你们都懂了,太细节的就不写在教程中了🤣🤣🤣)
- 博客魔改有风险,如果博客魔改出问题了又没有备份,可通过此项目查看基础源码进行 回滚: jerryc127/hexo-theme-butterfly、 ccknbc-actions/blog-butterfly。
- 这部分魔改基本上都是大佬们造好的轮子,我按照大佬们的轮子结合自己的喜好进行魔改的,具体见我友人帐第一个栏目大佬们的网站,本处仅做一个总结,如有侵权请联系删除。
- 鉴于每个人的根目录名称都不一样,本帖 博客根目录 一律以
[BlogRoot]指代。 - 本帖涉及魔改源码的内容,会使用 diff代码块 标识,复制时请 不要忘记删除 前面的
+、-符号。 - 因为
.pug和.styl以及.yml等对缩进要求较为严格,请尽量 不要使用记事本等无法提供语法高亮的文本编辑器 进行修改。 - 本帖基于
Butterfly主题进行魔改方案编写,因此请读者优先掌握 Butterfly主题官方文档 的内容后再来进行魔改。 - 魔改会过程常常引入 自定义的css与js文件,方法见 Hexo博客添加自定义css和js文件(太懒了不想自己写)
外挂标签的引入(店长)
点击查看教程
详见: Tag Plugins Plus
- 安装插件,在博客根目录
[BlogRoot]下打开终端,运行以下指令:1
npm install hexo-butterfly-tag-plugins-plus --save
考虑到hexo自带的markdown渲染插件 hexo-renderer-marked 与外挂标签语法的兼容性较差,建议您将其替换成 hexo-renderer-kramed1
2npm uninstall hexo-renderer-marked --save
npm install hexo-renderer-kramed --save
- 添加配置信息,以下为写法示例
在站点配置文件 _config.yml 或者主题配置文件 _config.butterfly.yml 中添加1
2
3
4
5
6
7
8
9
10
11
12
13
14
15# tag-plugins-plus
# see https://akilar.top/posts/615e2dec/
tag_plugins:
enable: true # 开关
priority: 5 #过滤器优先权
issues: false #issues标签依赖注入开关
link:
placeholder: /img/link.png #link_card标签默认的图标图片
CDN:
anima: https://npm.elemecdn.com/hexo-butterfly-tag-plugins-plus@latest/lib/assets/font-awesome-animation.min.css #动画标签anima的依赖
jquery: https://npm.elemecdn.com/jquery@latest/dist/jquery.min.js #issues标签依赖
issues: https://npm.elemecdn.com/hexo-butterfly-tag-plugins-plus@latest/lib/assets/issues.js #issues标签依赖
iconfont: //at.alicdn.com/t/font_2032782_8d5kxvn09md.js #参看https://akilar.top/posts/d2ebecef/
carousel: https://npm.elemecdn.com/hexo-butterfly-tag-plugins-plus@latest/lib/assets/carousel-touch.js
tag_plugins_css: https://npm.elemecdn.com/hexo-butterfly-tag-plugins-plus@latest/lib/tag_plugins.css
- 参数释义
| 参数 | 备选值/类型 | 释义 |
|---|---|---|
| enable | true/false | 【必选】控制开关 |
| priority | number | 【可选】过滤器优先级,数值越小,执行越早,默认为10,选填 |
| issues | true/false | 【可选】issues标签控制开关,默认为false |
| link.placeholder | 【必选】link卡片外挂标签的默认图标 | |
| CDN.anima | URL | 【可选】动画标签anima的依赖 |
| CDN.jquery | URL | 【可选】issues标签依赖 |
| CDN.issues | URL | 【可选】issues标签依赖 |
| CDN.iconfont | URL | 【可选】iconfont标签symbol样式引入,如果不想引入,则设为false |
| CDN.carousel | URL | 【可选】carousel旋转相册标签鼠标拖动依赖,如果不想引入则设为false |
| CDN.tag_plugins_css | URL | 【可选】外挂标签样式的CSS依赖,为避免CDN缓存延迟,建议将@latest改为具体版本号 |
具体样式和写法可见: Markdown语法与外挂标签写法汇总
听话的鼠标魔改
点击查看教程
效果预览

- 新建文件
[BlogRoot]\source\js\cursor.js,在里面写上如下代码:
1 | var CURSOR; |
其中比较重要的参数就是鼠标的尺寸和颜色,已经在上图中标出,目前发现颜色只支持RGB写法和固有名称写法(例如red这种),其他参数也可以自行摸索:1
* {cursor: url("data:image/svg+xml,<svg xmlns='http://www.w3.org/2000/svg' viewBox='0 0 8 8' width='8px' height='8px'><circle cx='4' cy='4' r='4' opacity='1.0' fill='rgb(57, 197, 187)'/></svg>") 4 4, auto}`
- 在
[BlogRoot]\source\css\custom.css添加如下代码:
1 | /* 鼠标样式 */ |
这里比较重要的参数就是鼠标跟随的圆形颜色,可以根据自己的喜好进行更改:
1 | #cursor { |
- 在主题配置文件
_config.butterfly.yml文件的inject配置项引入刚刚创建的css文件和js文件:
1 | inject: |
- 重启项目即可看见效果:
1
hexo cl; hexo s
页面样式调节
点击查看教程
这个教程是通过css样式调节各个页面透明度、模糊度(亚克力效果)、圆角、边框样式等,看起来会更加舒适。
- 复制以下代码进去自定义的
custom.css文件
1 | :root { |
参数说明:
--trans-light:白天模式带透明度的背景色,如rgba(255, 255, 255, 0.88)底色是纯白色,其中0.88就透明度,在0-1之间调节,值越大越不透明;--trans-dark: 夜间模式带透明度的背景色,如rgba(25, 25, 25, 0.88)底色是柔和黑色,其中0.88就透明度,在0-1之间调节,值越大越不透明;--border-style: 边框样式,1px solid rgb(169, 169, 169)指宽度为1px的灰色实体边框;--backdrop-filter: 背景过滤器,如blur(5px) saturate(150%)表示饱和度为150%的、高斯模糊半径为5px的过滤器,这是亚克力效果的一种实现方法;大家可以根据自己喜好进行调节,不用拘泥于我的样式!
- 记住在主题配置文件
_config.butterfly.yml的inject配置项中引入该css文件:
1 | inject: |
- 重启项目即可看见效果:
1 | hexo cl; hexo s |
引入iconfont自定义图标(店长)
点击查看教程
详见: Iconfont Inject
新建图标项目
访问 阿里巴巴矢量图标库,注册登录。
搜索自己心仪的图标,然后选择 添加入库,加到购物车。
选择完毕后点击右上角的购物车图标,打开侧栏,选择添加到项目,如果没有项目就新建一个。
- 可以通过上方顶栏菜单->资源管理->我的项目,找到之前添加的图标项目。(现在的iconfont可以在图标库的项目设置里直接打开彩色设置,然后采用fontclass的引用方式即可使用多彩图标。但是 单一项目彩色图标上限是40个图标,酌情采用。)
引入图标
线上引入方案,我使用的是官方文档中最便捷的 font-class 方案。这一方案偶尔会出现图标加载不出的情况。但是便于随时对图标库进行升级,换一下在线链接即可,适合新手使用。最新版本的iconfont支持直接在项目设置中开启彩色图标,从而实现直接用class添加多彩色图标。(推荐直接用这个即可)
- 在
[BlogRoot]\themes\butterfly\source\css\custom.css中填写如下内容,引入Unicode和Font-class的线上资源:1
@import "//at.alicdn.com/t/font_2264842_b004iy0kk2b.css";
更推荐在在主题配置文件 inject 配置项进行全局引入:1
2
3
4
5inject:
head:
- <link rel="stylesheet" href="//at.alicdn.com/t/font_2264842_b004iy0kk2b.css" media="defer" onload="this.media='all'">
bottom:
- <script async src="//at.alicdn.com/t/font_2264842_b004iy0kk2b.js"></script>
同时可以在自定义
CSS中添加如下样式来控制图标默认大小和颜色等属性( 若已经在项目设置中勾选了彩色选项,则无需再定义图标颜色),写法与字体样式类似,这恐怕也是它被称为iconfont(图标字体)的原因:1
2
3
4
5
6
7
8.iconfont {
font-family: "iconfont" ;
/* 这里可以自定义图标大小 */
font-size: 3em;
font-style: normal;
-webkit-font-smoothing: antialiased;
-moz-osx-font-smoothing: grayscale;
}可以通过自己的阿里图标库的font-class方案查询复制相应的
icon-xxxx。1
2
3
4
5
6
7
8
9
10
11
12<i class="iconfont icon-rat"></i>
<i class="iconfont icon-ox"></i>
<i class="iconfont icon-tiger"></i>
<i class="iconfont icon-rabbit"></i>
<i class="iconfont icon-dragon"></i>
<i class="iconfont icon-snake"></i>
<i class="iconfont icon-horse"></i>
<i class="iconfont icon-goat"></i>
<i class="iconfont icon-monkey"></i>
<i class="iconfont icon-rooster"></i>
<i class="iconfont icon-dog"></i>
<i class="iconfont icon-boar"></i>
菜单栏多色动态图标(店长)
点击查看教程
详见: 糖果屋微调合集
相比于静态的图标,个人更喜欢动态的,因此一步到位!
效果预览:
效果预览
前置教程: Hexo引入阿里矢量图标库-iconfont inject 和 基于Butterfly的外挂标签引入-Tag Plugins Plus 中关于 动态标签anima 的内容。请确保您已经完成了前置教程,并实现了在文章中使用 symbol 写法来引入 iconfont 图标。同时引入了 fontawesome_animation 的前置依赖。
主要检查您的 inject 配置项中是否有这两个依赖1
2
3
4
5
6
7inject:
head:
#动画标签anima的依赖
- <link rel="stylesheet" href="https://cdn.jsdelivr.net/gh/l-lin/font-awesome-animation/dist/font-awesome-animation.min.css" media="defer" onload="this.media='all'">
bottom:
# 阿里矢量图标,这串是我的图标库,你的链接会有所不同。
- <script async src="//at.alicdn.com/t/font_2032782_ev6ytrh30f.js"></script>
替换
[BlogRoot]\themes\butterfly\layout\includes\header\menu_item.pug为以下代码,本方案默认使用观感最佳的悬停父元素触发子元素动画效果,默认动画为faa-tada。注意:可以把之前的代码注释掉,再在后面加上如下代码,以便于回滚,此代码在butterfly 4.3.1上可以运行并保留hide字段隐藏子菜单的功能,其他版本自行测试。代码的本质并不复杂,就是扫描配置文件对应的配置项,然后根据||的分割标志筛选出对应的图标名称、对应链接等,从而渲染出html页面。1
2
3
4
5
6
7
8
9
10
11
12
13
14
15
16
17
18
19
20
21
22
23
24
25
26
27
28
29
30
31
32
33
34
35
36
37
38
39
40
41
42
43
44
45
46if theme.menu
.menus_items
each value, label in theme.menu
if typeof value !== 'object'
.menus_item
- const valueArray = value.split('||')
a.site-page.faa-parent.animated-hover(href=url_for(trim(value.split('||')[0])))
if valueArray[1]
i.fa-fw(class=trim(valueArray[1]))
- var icon_value = trim(value.split('||')[1])
- var anima_value = value.split('||')[2] ? trim(value.split('||')[2]) : 'faa-tada'
if icon_value.substring(0,2)=="fa"
i.fa-fw(class=icon_value + ' ' + anima_value)
else if icon_value.substring(0,4)=="icon"
svg.icon(aria-hidden="true" class=anima_value)
use(xlink:href=`#`+ icon_value)
span=' '+label
else
.menus_item
- const labelArray = label.split('||')
- const hideClass = labelArray[3] && trim(labelArray[3]) === 'hide' ? 'hide' : ''
a.site-page.group.faa-parent.animated-hover(class=`${hideClass}` href='javascript:void(0);')
if labelArray[1]
- var icon_label = trim(label.split('||')[1])
- var anima_label = label.split('||')[2] ? trim(label.split('||')[2]) : 'faa-tada'
if icon_label.substring(0,2)=="fa"
i.fa-fw(class=icon_label + ' ' + anima_label)
else if icon_label.substring(0,4)=="icon"
svg.icon(aria-hidden="true" class=anima_label)
use(xlink:href=`#`+ icon_label)
span=' '+ trim(labelArray[0])
i.fas.fa-chevron-down
ul.menus_item_child
each val,lab in value
- const valArray = val.split('||')
li
a.site-page.child.faa-parent.animated-hover(href=url_for(trim(val.split('||')[0])))
if valArray[1]
- var icon_val = trim(val.split('||')[1])
- var anima_val = val.split('||')[2] ? trim(val.split('||')[2]) : 'faa-tada'
if icon_val.substring(0,2)=="fa"
i.fa-fw(class=icon_val + ' ' + anima_val)
else if icon_val.substring(0,4)=="icon"
svg.icon(aria-hidden="true" class=anima_val)
use(xlink:href=`#`+ icon_val)
span=' '+ lab以下是填写示例,在
[BlogRoot]\_config.butterfly.yml中修改。icon-xxx字样的为iconfont的symbol引入方案的id值,可以在你的iconfont图标库内查询,其中hide属性也是可以用的。1
2
3
4
5
6
7menu:
首页: / || icon-home || faa-tada
文章 || icon--article || faa-tada || hide:
归档: /archives/ || icon-guidang1 || faa-tada
标签: /tags/ || icon-sekuaibiaoqian || faa-tada
分类: /categories/ || icon-fenlei || faa-tada
随便逛逛: javascript:randomPost(); || icon-zuji1 || faa-tada要注意的是,这里的动态图标是
svg.icon的标签,因此上面调节.iconfont的css并不使用,我们需要在自定义样式文件custom.css里加上一些样式来限制图标的大小和颜色等,具体大小自行调节。1
2
3
4
5
6
7svg.icon {
width: 1.28em;
height: 1.28em;
vertical-align: -0.15em;
fill: currentColor;
overflow: hidden;
}重启项目即可看到效果:
1
hexo cl; hexo s
Social卡片彩色图标引入(店长)
点击查看教程
详见: 糖果屋微调合集
效果预览:
效果预览
代码原理和上面的菜单栏基本一致,所以各个前置教程都不再重复,这里只提供代码魔改内容和配置项编写方案。(记住要引入了自己的图标再来看这个教程!!!)
重写
[BlogRoot]\themes\butterfly\layout\includes\header\social.pug,替换为以下代码:1
2
3
4
5
6
7
8
9
10each value, title in theme.social
a.social-icon.faa-parent.animated-hover(href=url_for(trim(value.split('||')[0])) target="_blank" title=title === undefined ? '' : trim(title))
if value.split('||')[1]
- var icon_value = trim(value.split('||')[1])
- var anima_value = value.split('||')[2] ? trim(value.split('||')[2]) : 'faa-tada'
if icon_value.substring(0,2)=="fa"
i.fa-fw(class=icon_value + ' ' + anima_value)
else if icon_value.substring(0,4)=="icon"
svg.icon(aria-hidden="true" class=anima_value)
use(xlink:href=`#`+ icon_value)以下为对应的
social配置项。写法沿用menu_item的写法示例,修改[BlogRoot]\_config.butterfly.yml的social配置项,具体的链接改为自己的。1
2
3
4
5
6social:
微信: /assets/QRCode.jpg || icon-weixin || faa-tada
QQ: https://res.abeim.cn/api/qq/?qq=1174008660 || icon-QQ || faa-tada
B站: https://space.bilibili.com/220757832 || icon-bilibili || faa-tada
QQ邮箱: mailto:1174008660@qq.com || icon-youxiang || faa-tada
力扣: https://leetcode.cn/u/fomalhaut1998 || icon-leetcode || faa-tada要注意的是,这里的动态图标是
svg.icon的标签,因此上面调节.iconfont的css并不使用,我们需要在自定义样式文件custom.css里加上一些样式来限制图标的大小和颜色等,具体大小自行调节(如果上面弄过菜单栏的图标大小,这里也就不需要再重复写了)。1
2
3
4
5
6
7svg.icon {
width: 1.28em;
height: 1.28em;
vertical-align: -0.15em;
fill: currentColor;
overflow: hidden;
}进阶操作:不知道大家发现没有,这个css对菜单栏的图标和对社交图标同时生效,但是有时候我们想这两者有不一样的大小,怎么办?其实很简单,只要我们给这两部分的图标元素贴上不同的“标签”就可以,这个标签可以是
id,也可以是class,但是众所周知html中的id是唯一的,我们这里有多个图标,因此贴上不通的class比较合适,因此我们改造一下[BlogRoot]\themes\butterfly\layout\includes\header\social.pug这个文件
1 | each value, title in theme.social |
上面的改动会将图标渲染成 class=social_icon 的标签,现在我们可以区分菜单栏还是社交的图标的,如果想调节社交图标的大小就用以下的css1
2
3
4
5
6
7svg.social_icon {
width: 1.20em;
height: 1.20em;
vertical-align: -0.15em;
fill: currentColor;
overflow: hidden;
}
举一反三,要想专门用css改动菜单栏图标大小,只需要将 [BlogRoot]\themes\butterfly\layout\includes\header\menu_item.pug 文件中的 svg.icon 替换成 svg.menu_icon,然后用以下的css
1 | svg.menu_icon { |
- 重启项目即可看到效果:
1 | hexo cl; hexo s |
侧边栏图标和文字自定义
点击查看教程
效果预览
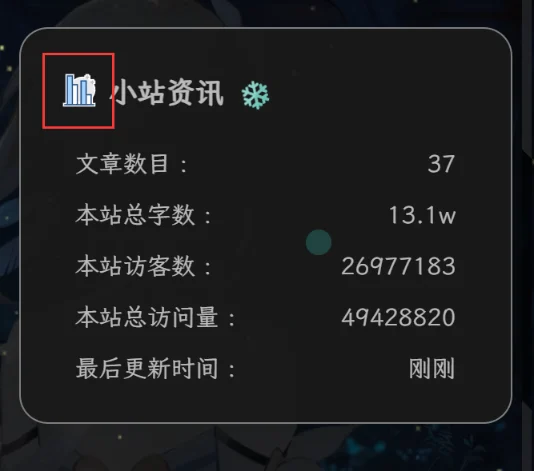
这里的图标也是用的iconfont的,请完成前面的图标引入教程!由于侧边栏比较多,这里就演示改网站信息,剩下的侧边栏改法几乎一样的!(记住要引入了自己的图标再来看这个教程!!!)
- 进入
[BlogRoot]\themes\butterfly\layout\includes\widget\card_webinfo.pug,进行以下修改,因为默认的图标是font-awesome的黑白图标,就是i.fas.fa-chart-line那一行,删除,然后引入新的图标标签,其中图标的样式、名称等参考自己的需要进行更改,样式主要是width、height、position、top这几个属性,这里的animated-hover和faa-tada是给对应的元素套上对应的class,如果装了动画依赖,扫描到这些class的元素会自动挂载动画样式,如果不想要可以去除。
1 | if theme.aside.card_webinfo.enable |
- 接下来就是改文了,注意到第8行的
span= _p('aside.card_webinfo.headline'),这行代码就是渲染图标后面的文字,我们其实可以直接改成span= _p('小站资讯'),这样就已经按照自己的文字显示了,但是为了更好维护,我们遵循主题的设计原则,注意到变量aside.card_webinfo.headline,这其实是在写好的语言包中扫描对应的值,因为不同的语言对应不同的文字,如果我们设置了语言为zh-CN那么就到[BlogRoot]\themes\butterfly\languages\zh-CN.yml进行修改。yml文件是以缩进区分层级的,我们只需要寻找aside->card_webinfo->headline这一项修改为自己喜欢的内容即可
1 | aside: |
- 最后重新编译运行即可看见效果。
1 | hexo cl; hexo s |
渐变色版权美化(店长+微调)
点击查看教程
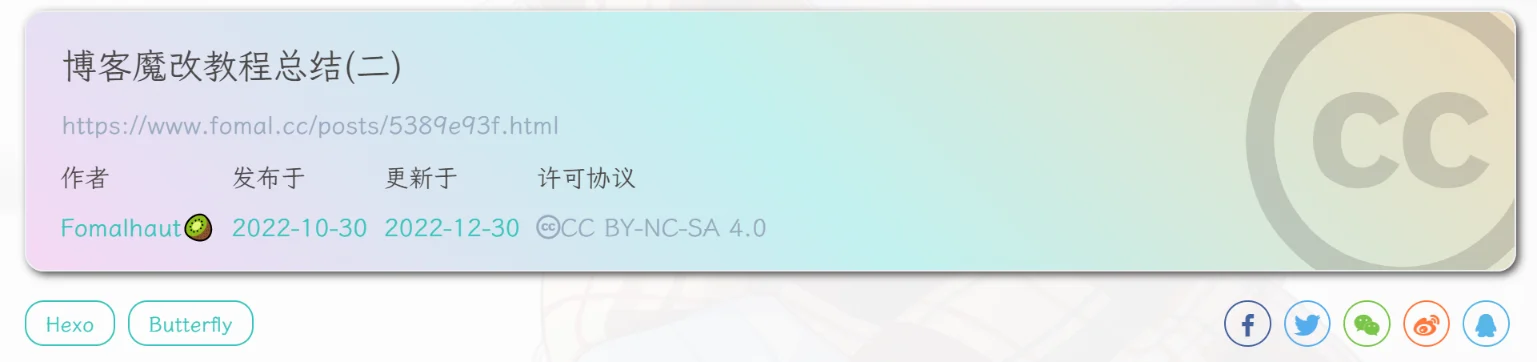
效果预览
- 修改
[BlogRoot]\themes\butterfly\layout\includes\post\post-copyright.pug,直接复制以下内容替换原文件内容。此处多次用到了三元运算符作为默认项设置,在确保有主题配置文件的默认项的情况下,也可以在相应文章的front-matter中重新定义作者,原文链接,开源许可协议等内容。
1 | if theme.post_copyright.enable && page.copyright !== false |
- 修改
[BlogRoot]\themes\butterfly\source\css\_layout\post.styl,直接复制以下内容,替换原文件,这个文件就是自己调节样式的。其中,184行是白天模式的背景色,这里默认是我网站的渐变色,大家可以根据自己的喜好调节;253行是夜间模式的发光光圈颜色,大家也可以自行替换成自己喜欢的颜色:
1 | beautify() |
默认项的配置
- 作者:
[BlogRoot]\_config.yml中的author配置项
- 作者:
1 | # Site |
- 许可协议:
[BlogRoot]\_config.butterfly.yml中的license和license_url配置项
1 | post_copyright: |
- 页面覆写配置项,修改对应文章的
front-matter
1 | --- |
aplayer音乐播放器
点击查看教程
效果预览
注意:我这里只在某个页面引入音乐播放器,如果要引入全局吸底的播放器,请见上面的链接。
- 在博客根目录
[BlogRoot]下打开终端,运行以下指令:
1 | npm install hexo-tag-aplayer --save |
- 在网站配置文件
_config.yml中修改aplayer配置项为:
1 | # 音乐插件 |
- 在主题配置文件
_config.butterfly.yml中修改aplayerInject配置项为:
1 | # Inject the css and script (aplayer/meting) |
- 在你想要加入音乐播放器的页面加入以下语句:
1 | <div id="aplayer-oSEOhviA" class="aplayer aplayer-tag-marker meting-tag-marker" data-id="4895239160" data-server="netease" data-type="playlist" data-mode="random" data-autoplay="false" data-listmaxheight="340px" data-preload="auto" data-theme="#e3f2f5" data-volume="0.4" mutex="true"></div> |
其中 data-id 为歌单ID可以换为你喜欢的歌曲,其他参数见详情页这里不再赘述!
顶部渐变条色加载条
点击查看教程
效果预览
- 新建
[BlogRoot]\source\css\progress_bar.css文件,写入以下内容(或者你在[BlogRoot]\source\css\custom.css直接加也行,最后在配置文件记得引入即可)
1 | .pace { |
- 在主题配置文件
_config.butterfly.yml的inject配置项加入刚刚的css样式和必须的js依赖:
1 | inject: |
Bilibili视频适配
点击查看教程
效果预览
- 在
[BlogRoot]\source\css\custom.css自定义样式的文件中引入如下代码(这是我的,你可以自行微调):
1 | /*哔哩哔哩视频适配*/ |
- 直接复制插入你的
md文章就行,修改里面的aid为你视频的AV号:
1 | <div align=center class="aspect-ratio"> |
文章页局部 html 代码不渲染
点击查看教程
在你的 md 文章页中,部分内容不想经过 Hexo 渲染,则包一层 raw 标签:
1 | {% raw %} |
那么标签内的代码就不会被框架渲染了~
文章H1~H6标题小风车转动效果
点击查看教程
效果预览
Your browser does not support the video tag.
- 修改主题配置文件
_config.butterfly.yml文件的beautify配置项:
1 | beautify: |
- 在
[BlogRoot]\source\css\custom.css中加入以下代码,可以自己调节一下转速:
1 | /* 文章页H1-H6图标样式效果 */ |
- 在主题配置文件
_config.butterfly.yml的inject配置项进行引入(不再赘述)。
挂绳小猫咪(tzy大佬)
点击查看教程
详见: 请收下这只可爱的猫咪吧
效果预览

- 制作一个盛放内容的盒子,在
[BlogRoot]/node_modules/hexo-theme-butterfly/layout/includes/head.pug(如果是git clone安装在[BlogRoot]/themes/butterfly/layout/includes/head.pug)最后一行加入如下代码:
1 | #myscoll |
其实随便放在哪里都行,只要能加载出来就行
- 在
[BlogRoot]/node_modules/hexo-theme-butterfly/source/js文件夹下新建一个cat.js,将以下代码复制到文件中。
1 | if (document.body.clientWidth > 992) { |
- 在
[BlogRoot]/node_modules/hexo-theme-butterfly/source/css文件夹下新建一个cat.css,将以下代码复制到文件中。当然你也可以选择不新建 css 文件,复制代码到custom.css也行,总之有地方引入就行。
1 |
|
- 在主题配置文件
_config.butterfly.yml中引入cat.js和cat.css,当然还有在bottom的最前面引入jQuery,因为cat.js的语法依赖jQuery。
1 | inject: |
- 最后重新编译运行即可看见效果。
1 | hexo cl; hexo s |
配置手机PC页面白天黑夜共四个背景图(店长)
点击查看教程
详见: 糖果屋微调合集
- 首先是PC端的白天黑夜双背景,修改
[BlogRoot]\themes\butterfly\layout\includes\layout.pug
1 | + - var DefaultBg = page.defaultbg ? page.defaultbg : theme.background.default |
- 再是实现手机端的白天黑夜双背景,在
[BlogRoot]\themes\butterfly\source\css\_layout目录下新建一个web-bg.styl文件,写入以下内容:
1 | $web-bg-night = hexo-config('background.darkmode') ? unquote(hexo-config('background.darkmode')) : $web-bg |
- 然后还要修改一下
[BlogRoot]\themes\butterfly\source\css\var.styl,大约35行的位置
1 | $text-line-height = 2 |
- 再修改一下配置项,在
[BlogRoot]/_config.butterfly.yml中找到background配置项,内容改为:
1 | # Website Background (設置網站背景) |
- 当开了
Pjax,还要再把#web_bg加到pjax选择器中。修改[BlogRoot]\themes\butterfly\layout\includes\third-party\pjax.pug
1 | script(src=url_for(theme.CDN.pjax)) |
每页单独配置背景(店长)
点击查看教程
Butterfly 使用 id 为 web_bg 的 div(以下简称 #web_bg)来挂载背景图片,而背景图片是使用的 #web_bg 的 background 属性来配置,所以只需要改动这个css属性就可以。例如直接在md页面加入这样一条自定义样式。
1 | {% raw %} |
而更好的方案自然是在 front-matter 中通过新增一个 background 配置项来配置页面背景。
注意:此魔改可能和 配置手机PC页面白天黑夜共四个背景图 冲突,最好不要同时改!
- 修改
[BlogRoot]\themes\butterfly\layout\includes\layout.pug
1 | if theme.background |
- 如此即可在每个页面的
markdown文件的front-matter中使用background配置项单独配置页面背景了,不写或留空则使用主题配置文件中的默认背景。
1 | --- |
- 当开了
Pjax,还要再把#web_bg加到pjax选择器中。修改[BlogRoot]\themes\butterfly\layout\includes\third-party\pjax.pug
1 | script(src=url_for(theme.CDN.pjax)) |